
Last Updated on
By David Curtis
Today I want to look at what I feel is one of the most important and yet often neglected firearm accessories, particularly for weapons that may be used in self-defense. I’m referring to the flashlight. I want to look at why lights are important, which ones I recommend, and how they relate to some other useful accessories.
Weapon lights usually aren’t as glamorous as some other accessories such as lasers. But a good light will solve one of the biggest issues of many self defense encounters: darkness. A light will let you see your sights and your intended target. If you’re using the gun in an environment where there is sufficient light, illumination is just one less thing to think about. But if you need to pick up the gun while it’s dark inside, you’ll be glad the light is there.
Now, I don’t want to be discouraging if you have your eye on a laser. Lasers can be very useful in some circumstances. In those cases it can allow you to get good hits faster. But what if there isn’t adequate light to ID your target? The laser can show you where your gun is pointed, but won’t help you see at what the gun is pointed. This goes back to #4 of the 4 Rules of Firearm Safety: Be sure of your target and what is behind it. Because of possibilities like these, I recommend that you address the issue of illumination first, and only then see if a laser can be added into the mix.
All kinds of defensive guns can benefit from lights. Carbine users should have a light and a sling, with a red dot or low-powered variable with reliable illumination strongly recommended. Shotgun users mostly just need a light and a sling, but a way to carry additional ammo on the gun might also be an important consideration for some. Pistol users should have a light and in most cases a fast-access safe and/or a good rigid holster. These are just bare minimum recommendations. Your particular environment and personal considerations will probably add to the list. But, the light is common to all three types of gun. In fact, I strongly recommend that any self defense firearm be equipped with a light.
As with most firearm accessories, shooters have plenty of options to choose from when it comes to lights, which can make selection difficult. In general I would expect to spend close to one hundred dollars for a good weapon light. Some of the cheapest options cost only a third as much, and some of the nicest models can cost three times as much. You get what you pay for, but you won’t have to break the bank to get a dependable light.
Before I get into specific recommendations, I want to cover some terminology. First, there are two basic types of light sources in this market: LEDs and incandescent bulbs. LEDs are almost universally better, but I have seen a few lights with bulbs still available. LEDs are just tougher and more durable than bulbs. LEDs do not burn out in anywhere near the same time frame as a bulb, and should last through tens of thousands of use cycles. Additionally, LEDs do not rely on fragile glass fixtures containing vacuums. The LED design is simpler, smaller, and more robust. Those are exactly the qualities you’re looking for in illumination technology for use on a firearm.
The other thing to understand before start looking at specific models is how most manufacturers rate the output of their flashlights. These ratings are designed to help you compare various options. Most brands list the output of their lights in a unit called the lumen. Lumens are probably thought of by most as just another way to describe the brightness or intensity of the light source. However, that is actually a different unit, the candela. The lumen is a unit for measuring the amount of light in a given volume.
For a given lumen output, say 200 lumens, you might have a narrow spotlight beam such as with the Streamlight HP series. This light will seem very bright, because it’s going to focus all 200 of its lumens on a small area. This is the kind of beam pattern I would look for in a carbine light for use outdoors.
Or, for that same 200 lumens, you could have a wider floodlight beam as with the old Surefire X300 (it was really 170 lumens, but that’s close enough for comparison). That model will spread its lumens over a wider area, so no one point will be as brightly illuminated as the center of the Streamlight HP beam, but you get much more peripheral illumination with the X300, which can allow you to maintain better situational awareness. This type of beam pattern is ideal for most use indoors.
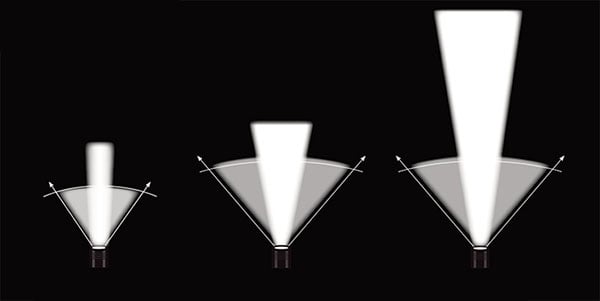
With lumens, more is generally better. More lumens means more total light output is available to fill a room, or reach a long way downrange. However, this doesn’t mean that you need the absolute brightest light available. The shape of the beam pattern can be as important as how many lumens a light produces. As with anything, usage determines what gear is needed.
For the most part, the illumination needs of pistol use are less demanding than for carbines. Pistol lights are generally designed with a wide beam pattern. You don’t normally need a pistol light to reach far away targets, and you probably want more light bouncing around to the sides letting you see everything around you.
Now that we have the basics out of the way, lets look at some examples of lights, and the roles they can fill on the pistol.
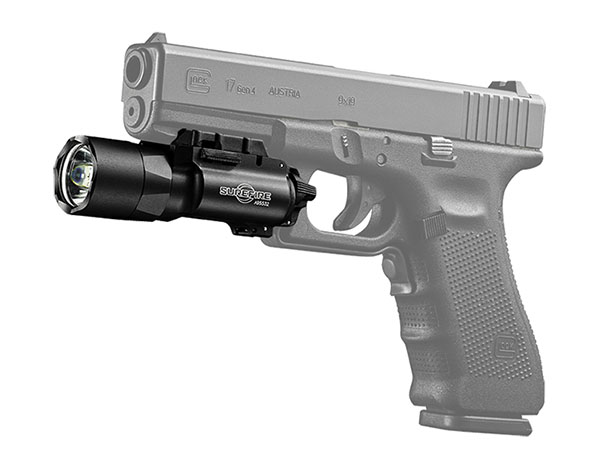
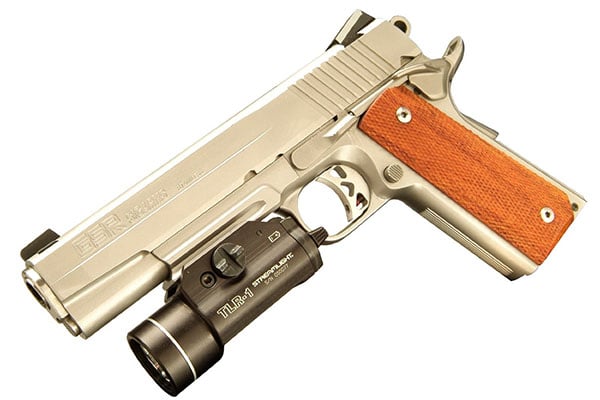
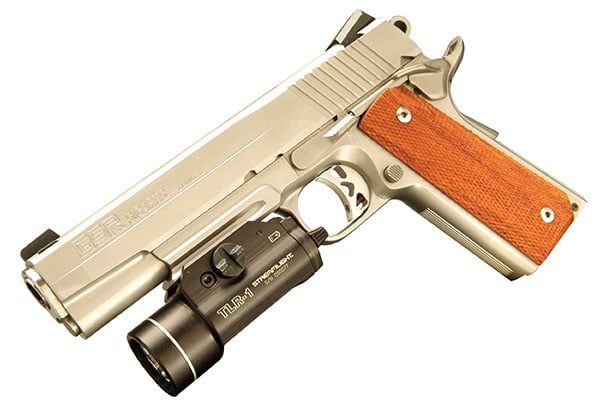
My favorite of the basic rail mounting lights is the Surefire X300 series. I like them most because they feature fully ambidextrous controls. The rocker switch at the back of the light can be accessed from either side. Rocking the switch in either direction will put the light in constant-on mode. The switch will click into the on position until you click it back off. Pressing forward on either side of the switch will activate the momentary-on mode, where the light will turn back off as soon as you cease forward pressure. The X300s also have the easiest installation. Simply slide the unit onto a universal rail from the front and it will snap into place on the rail’s cross-slot. The current X300 Ultra model produces a whopping 500 lumens. Of course, Surefire products are legendary for their reliability and durability. Unfortunately, this is the priciest option.
The next model of basic light is the Streamlight TLR-1. Rocking this light’s switch clockwise will click it into constant-on mode. Rocking it counter-clockwise will activate momentary mode. The controls aren’t perfectly ambidextrous this way, but thinking about it in terms of clock-direction should help you learn it more quickly. Streamlights use a clamping style mount that you operate by turning a screw on the side. This allows it to account for slight differences in rail dimensions between guns.
Streamlight currently has several models available of the TLR-1: The base model has a 300 lumen output. The next is the TLR-1s which adds a strobe function. The TLR-1 HL ups the output to 630 lumens, and then the TLR-1 HP and HPL are made with wider bezels producing long range spotlights for carbine applications. The TLR-2 adds a laser to the standard model.
If you have a subcompact pistol, Streamlight makes a few options for you as well. The TLR-3 is a pistol light small enough to fit on any pistol that has a universal or picatinny rail. The TLR-4 is the same unit with a laser added. The new TLR-6 is a slimline version that protrudes less to either side of the pistol for better comfort and concealment. Each of the Streamlight options offers a great balance of quality and price.
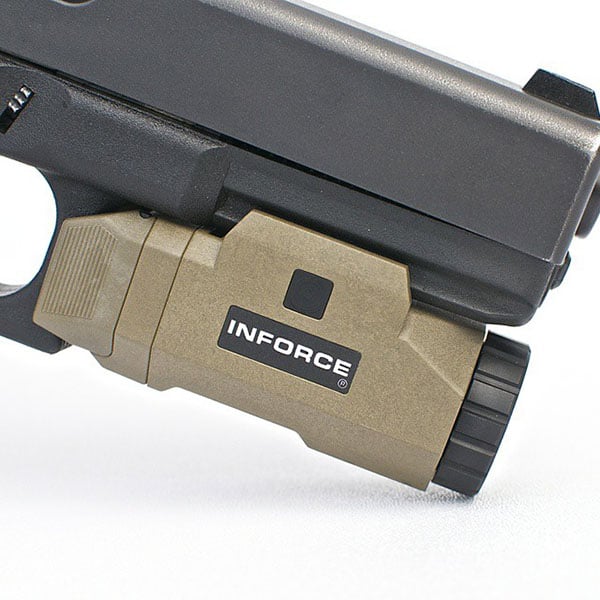
One of the most recent contenders in the compact weapon-light market is the Inforce. The Inforce APL does not use the rocker switch of the above lights. Instead it features paddles that can be pressed inward from either side. A quick press of the paddle will put the light in constant-on mode, while a steady pressure on the paddle will activate it in momentary mode instead. Like the Surefire, the APL operates ambidextrously. The unit keeps its width to a slim 1.2 inches; no more than the width of its rail clamp.
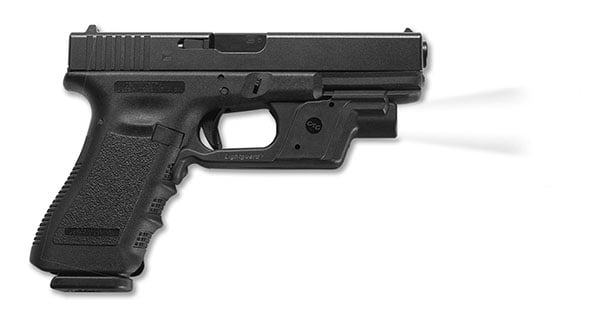
Another of my favorite pistol light options is the Crimson Trace Lightguard. The Lightguard gets away from the form factor of the above lights, and in a good way. It installs around the outside of the trigger guard of the host pistol instead of just to the accessory rail. Its main benefit over most other pistol lights in stock form is that the design moves the activation switch to the front strap of the pistol grip. This change allows you to activate the light without making changes to how you grip your gun. You don’t have to reach for a switch with your support thumb or trigger finger, potentially making your grip less effective in the process. You can activate the light just by squeezing more tightly with the middle finger of your firing hand. The switch operates only in momentary-on mode, so you control when and where you get light. The design is also pretty slim, so it shouldn’t affect the concealability of a pistol due to its width.
The Lightguard does affect the feel of your pistol a little. The thickness added to the trigger guard means that your middle finger will sit slightly lower on the grip. Also, because of the way it mounts, it has to be made for specific pistols. There are currently only four models: the 1911, Glock 17 and 19 sized frames, Smith & Wesson’s full size M&P, and the Springfield Armory XD and XD(M).
Because of the advantages of the grip activation method, both Surefire and Streamlight offer a remote switch as an accessory. These switches replace the battery door at the rear of the light where the rocker switches are currently mounted with one that follows the contour of the pistol’s trigger guard back to the grip’s front strap. Installation of these is as easy as chaning the batteries, and is definitely straightforward enough for you do do it yourself. As a plus,these accessories are made for a wider variety of pistols than the Crimson Trace Lightguard.
There are certainly a lot of other lights available for handguns, but these are my top picks. Once you’ve selected the right light for your use, it’s time to seek training with it. Find a qualified instructor to help you think through topics such as when to use handheld vs weapon mounted light and how to balance Rule #2 (Never point the gun at anything you’re not willing to shoot) against Rule #4 in darkness, and then… go practice.


Leave a Reply